Step 1: Installing the Salesforce managed package
Updated over a week ago
The Restaurantology Salesforce managed package allows your org to connect to our servers and periodically download the latest restaurant industry market intelligence.
Dashboards, report and widgets will automatically be appended to your Sales platform, and you can update existing Account layouts with new components and integrated information. Everything can be rearranged by your org administrator both during the installation process and at any point after.
This setup guide will walk you through the initial download and configuration of the Salesforce managed package. Additional detail and FAQs can be found in our knowledgebase.
Requirements
To proceed with the installation, be sure to have:
- a Salesforce instance
- admin privileges to your production instance
- the ability to update your Account page layout(s)
3 STEPS TO INSTALLING THE SALESFORCE MANAGED PACKAGE
[01] Installation and setup wizard
Managed packages extend Salesforce basic functionalities, and can be installed both quickly and easily.
You can begin the install process by following the following steps:
- Log into your Salesforce account as an Administrator.
- Click the install link provided to you by your Restaurantology implementation admin.
- Accept the Terms of Service by selecting the “I acknowledge that I’m installing a Non-Salesforce Application” checkbox –> this managed package has been developed by Restaurantology rather than Salesforce’s AppExchange team.
- Select “Install for all users” so that all users have access to Restaurantology’s managed package.
- Click the blue Install button.
- Approve Third-Party Access by granting access to our API AEternus server (Salesforce will automatically add the correct configuration to Setup > Remote Site Settings).

[02] Gather important details to activate a secure endpoint
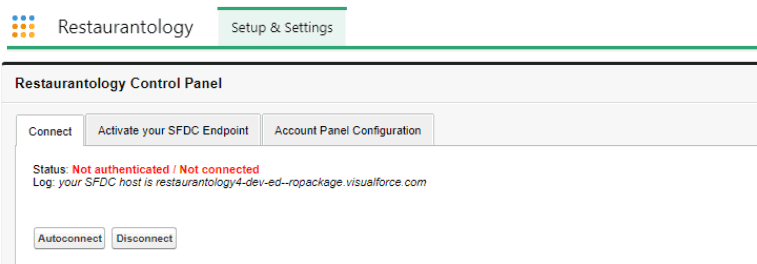
Once the installation process has completed successfully, admins will be immediately redirected to the Restaurantology App. In the event you closed the browser or aren’t redirected, don’t fret — you can navigate to the Restaurantology App by clicking the App icon.
Two more steps are required:
- From the Setup & Settings > “Connect” sub-tab, take note of your Salesforce host (something in the form of string.visualforce.com). You’ll be asked to provide this in your Salesforce Install Survey.
- In the “Activate your SFDC Endpoint” tab, you will find everything you need to allow your Salesforce instance to periodically receive our data.
Endpoints are points of contact between two different systems. In Salesforce, endpoints can be created or removed whenever you need by accessing Setup > User Interface > Sites and Domains > Sites. Simply follow the step-by-step guide included in the “Activate your SFDC Endpoint” tab.
Note: The required endpoint does not activate any broadcast method. This means it will never be used to send information from your Company’s Salesforce instance to external servers. Instead, it will receive incoming data, and will be isolated within an object dedicated to our Restaurantology database.

[03] Notify Restaurantology that you’ve completed the install/setup process
By now you should have collected:
- Your SFDC host (from the Connect tab)
- Your endpoint address. After configuring your new Restaurantology endpoint, Salesforce will show you its complete URI.
With those 2 pieces of information in hand, please complete the onboarding form provided by your Restaurantology admin.

